Desktop guide: Projection, annotations in multiple windows, original-text diagrams
2026-09-14
BiblePro Desktop 2.2.0 brings three major additions: annotations in multiple windows, diagrams for the biblical original text, and Projection. The 4-minute video below demonstrates all three (narration and on-screen subtitles are in Chinese); the written steps that follow cover the same ground.
Video walkthrough
Playback speed:
1.00x
Tap a timecode to jump straight to that chapter:
What is new in this release
Annotations: open in a new window, compare side by side
Original text: open a diagram, inspect words, linked scrolling
Projection: send selected verses to the big screen
Projection: custom slides, templates and groups
Recap
1. Annotations in multiple windows
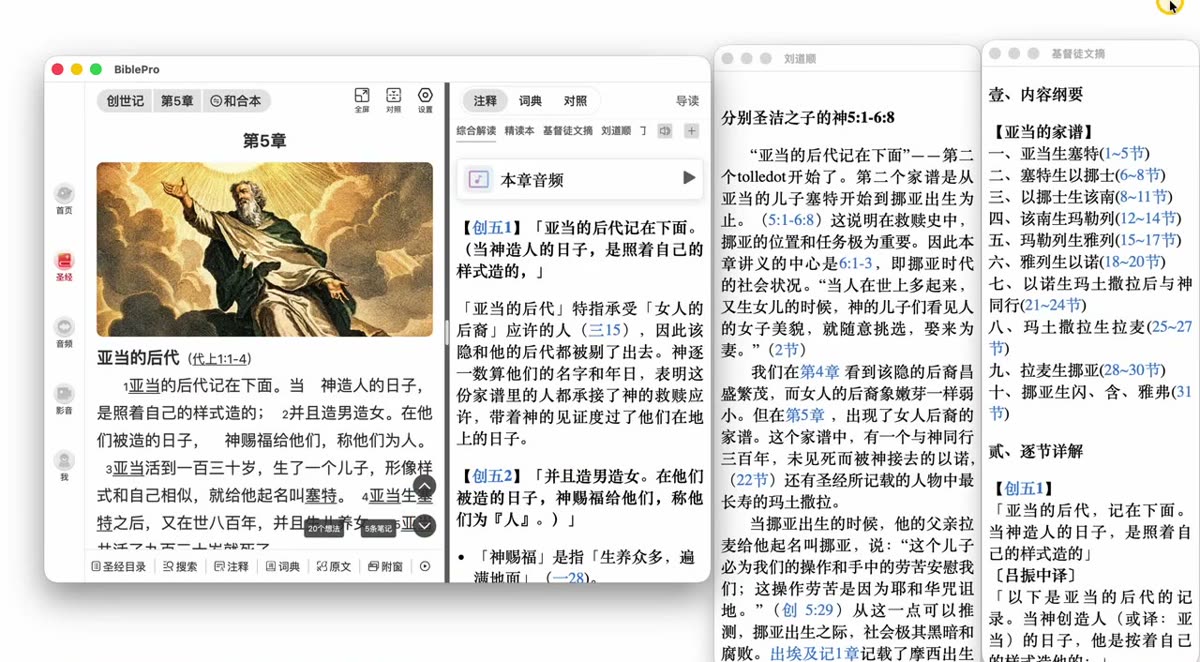
Annotations used to share the main window in a top/bottom split. Now each one can be torn off into its own window, so several commentaries sit side by side.
Open Annotations while reading
Right-click the name of an annotation
Choose Open in new window
Move and resize the new window freely — open as many as you need and keep them all on screen at once
Ideal for a large or dual monitor: Scripture in the main window, with the comprehensive commentary, study edition and other annotations lined up beside it.
2. Diagrams for the original text
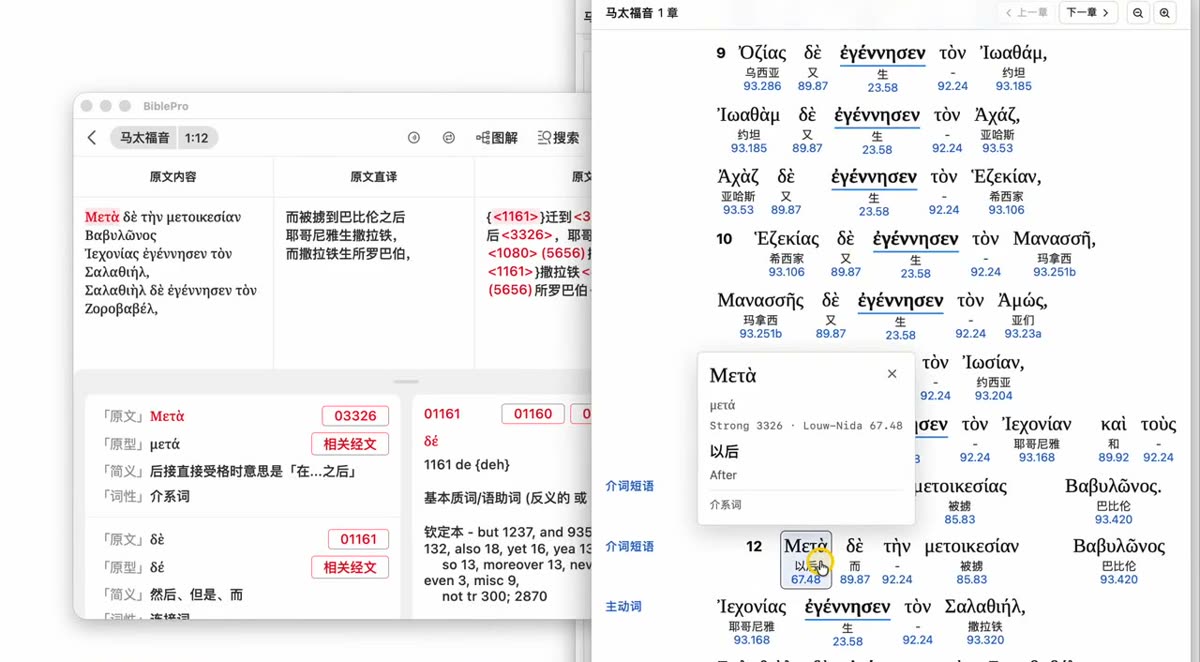
The Original Text module gains a Diagram section that draws the syntax of a verse — main clause, modifiers and parallel structures at a glance.
Open Original Text, then click Diagram at the top
Pick the diagram resource you want from the list and click OK
Once it opens, hover over or click any word to see its details (original form, lemma, gloss, part of speech, Strong’s number and more)
The two panes stay in sync: move to the next verse on the left and the right pane jumps to that verse automatically
You can open several different diagrams at once, and clicking a verse number inside a diagram moves the text on the left to match
Click a word for its gloss and Strong's number; both panes stay in sync
3. Projection
Projection is the headline feature of 2.2.0 — built for meetings, Bible study groups and Sunday worship. It works in two ways: projecting Scripture and building custom slides.
3.1 Projecting Scripture
Choose Projection in the bottom toolbar, or use multi-select in the Catalog
Tick the verses you want, click OK, then click Project
Choose how verses are paginated: one verse per page, or distribute automatically
With one verse per page you get a preview first — check it, then click Done
Pick the window to project onto (second display / projector) and click Start projection
Preview every page before you start; generated pages are listed on the left
3.2 Custom slides
Beyond Scripture, you can build slides for welcomes, prayer items and hymn lyrics.
Open Projection from the bottom toolbar → create a new projection
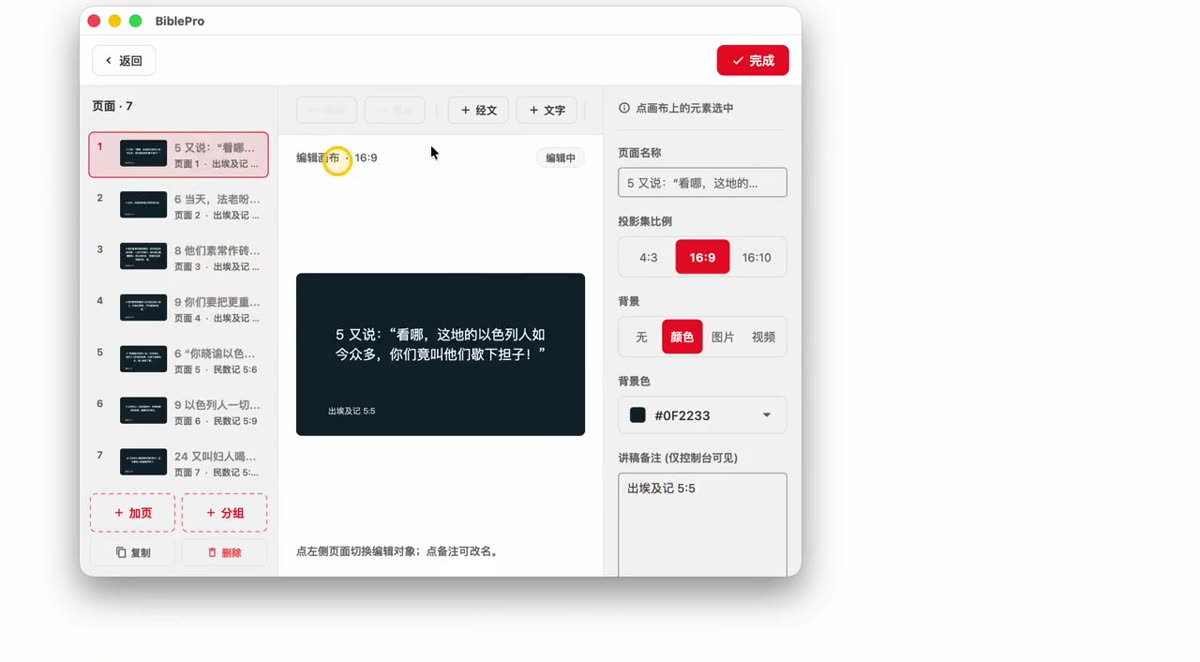
Choose the aspect ratio (4:3 / 16:9 / 16:10), pick a template, then create it
Double-click the content to edit the text; you can also insert + Verse and + Text
Rename a page (for example to “Opening welcome”) so it is easy to find in a long list
Use groups to organise pages (for example “Opening prayer”, “Praise and worship”) and duplicate pages within a group
Set the background to a colour, an image or a video, and add speaker notes (visible only on the control console, never on the projected screen)
When the slides are ready, click Project
Rename, group and duplicate pages; backgrounds can be a colour, image or video
3.3 While projecting
Action
What it does
↑ ↓ or ← →
Previous / next page
ESC
Exit projection
Editing a page
You can keep editing during projection — the projected screen updates automatically
Blackout
Blank the projected screen at any time (handy between segments)
Which version do I need?
These features require Desktop 2.2.0 or later (Windows / macOS). Click Download on the home page for the latest installer; the full list of changes is in the changelog.